
This article will explain jtime launchpad login. Weekly, JCPenney Workers have to access the JCP JTime area to view their weekly work schedules, shift timings, and other vital things connected to their work at the store. JTIme belongs to the JCPenney associate kiosk online site, and Staff members can access to the leading JCP partners website and login with their id and password. JTime Jcpenney is one of the work management tools which is very vital for JCPenney working associates. Being the first American department store, JCPenney has lots of workers at the stores. Everyone uses the time JCP tool to get updates regarding their work shift timings and schedules online.
How to Login at Jtime Launchpad or JCPenney Employee Portal 2023
In this article, you can learn about jtime launchpad login. Here are the details below;
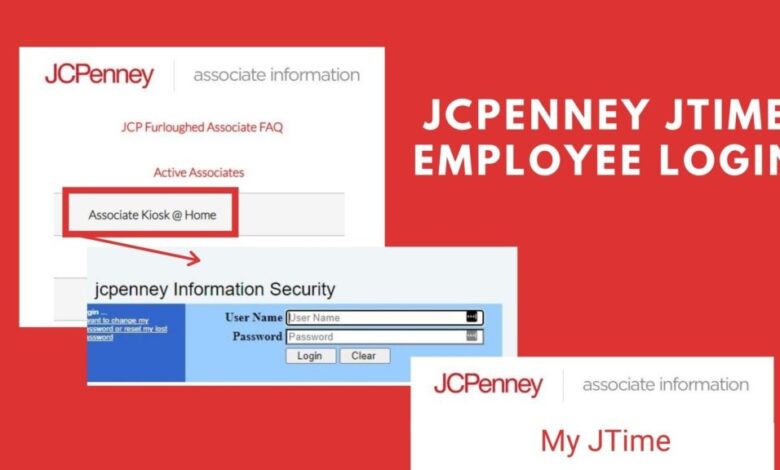
JCP JTime Login from Associate Kiosk @ HOME
Any workers needed to know the weekly schedules of their work at any company. If there are no such tools like Jtime, then the staff members must call the HR group regarding their work schedules and more. Also check MyKohlsCharge
To decrease this workload for HR group, the majority of the companies will utilize the worker self-service portal. In our case, jcpenney uses www.jcpassociates.com website for its employees.
JCP Associates is the one-stop option for all inquiries associated with worker management. It is an excellent tool for the partners to get the most recent updates about the business and get in touch with their managers.
Employees can access any info about their employment with JCP from anywhere and anytime.
JTime JCPenney Login to Access My JTIME Launchpad
JCPenney Jtime staff member login to access the launchpad to view staff member work schedules, shift timings, and track the leave of absence. Use the kiosk JCPenney option at home. You can also check Domuso LogIn
Follow the below steps on how to login JCP jtime:
– For accessing JTime, You require to very original login to JCPenney Partner Kiosk @ HOUSE.
– Go to the jcpassociates.com website portal.
– Choose the “Partner KIOSK @ Home” choice to visit.
– Enter your 9-digit staff member id and the password.
– After login, you will be instantly rerouted to the dashboard. You will find lots of choices offered.
– Find the “JTime Launchpad” or “My JTime” choice and press it.
– The existing week schedules will be packed, and alter the date to examine upcoming week schedules, vacations, and day-off shifts and timings.
Reset JCPenney JTime Password:
Today, The employees have the capability to change or reset the password directly from the Associates Kiosk @ House ie., JCPAssociates.com web website.
Here are the steps on how to alter your jtime jcp password: Also check Mnsu d2l
1. Gain access to the jcpassociates.com web portal.
2. Browse to “Partner KIOSK @ HOUSE”.
3. Discover the alternative to reset password which is at “I wish to change my password or reset my lost password”.
4. Verify the employee ID. Go into the 9-digit worker ID.
5. Solve the Security concerns. If there is no security concern, contact 1-800-870-1111 to get support with JCP HR Group.
6. Accept to the terms and conditions and press the “Continue” button.
7. Now, start the new password and retype the password properly. Ensure you are following the password guidelines.
8. Now, Go back to jcp partner kiosk portal and login with employee id and the new password.
JTime Launchpad.
Launchpad supplies complete detail about worker work schedules, timings, day-off accessibility, shop holiday dates, and more. Everything can be accessed right away with no effort to check out the HR Group. Employees can request leave straight from the launchpad. You can also check Menards Card Login
– View Work Schedules.
– View & Change Shift timings.
– Holiday summary.
– Demand day-off or view leave of absence days.
Frequently Asked Question for JCPenney Associates:
As the work management tool is new, most of the employees have problems and are not well aware of how to use this tool efficiently. Plus, JCPenney Staff member KIOSK issues too.
Below we had listed few questions that workers have:
– How do I access Jtime login for Jcpenney worker?
– How to trade shifts on JTime for JCPenney?
– How to cancel time off request in jtime jcpenney?
– How to publish shifts on Jtime?
– How to put in your 2 weeks notification at jcpenney jtime?
– and more associate faq on here.
If you have any such problem with the JCP Jtime tool, we request to comment listed below or get in touch with the manager for any queries. Also check Comcast Email Login