
Over-the-ear headphones are commonly acknowledged as the king of video gaming audio devices. This is because a number of them offer excellent audio quality, low latency, and outstanding audio isolating functions. Nevertheless, with the development of gaming earbuds, this idea has altered specifically for those who delight in gaming on their phones. The very best gaming earbuds include smooth styles, an ergonomic kind element, and incredible drivers; all of which come together to provide players with an immersive audio experience.
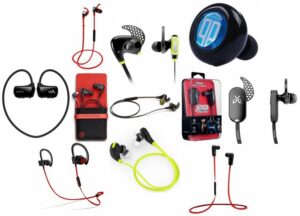
Video gaming earphones are especially great for gamers who play video games on their mobile devices and those who listen to music on the go. Similar to lots of other video gaming devices, they come with their own pros and downsides. In the evaluation listed below, we’ve assembled a list of the best earbuds for gaming and discussed their advantages and disadvantages.
We’ve likewise included an useful guide listed below to assist you comprehend a few of the necessary aspects to think about when buying the very best gaming earbuds, consisting of, noise cancellation, frequency reaction, audio profile, and more. So, without additional ado, let’s dive right in.
10 Best Earbuds for Gaming
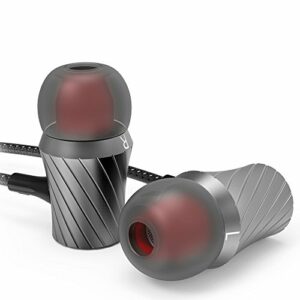
1. Razer Hammerhead True Wireless Bluetooth Earbuds
Best Wireless Earbuds For Gaming
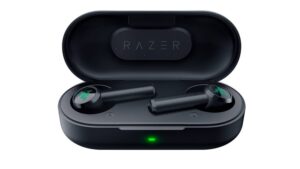
Razer is a brand name that’s focused on supplying gamers with state-of-the-art gadgets and devices. They provide a few of the best cordless headphones for games, keyboards, computer systems, and lots of other accessories. The Hammerhead True Wireless Bluetooth Earbuds are simply a testament to this truth. These wireless gaming earbuds feature a bass-heavy noise profile that assists bring out gunshots and surges in shooting video games. They are also developed with a “Game Mode” that assists reduce latency when connected to a smart device or any other mobile phone.
This function makes them some of the best earbuds for competitive video gaming. The Razer Hammerhead Gaming Earbuds offer excellent bass sounds, which can be awesome for shooter games and listening to bass-heavy songs especially tunes in the hip-hop and EDM category. Nevertheless, their mids and highs aren’t up to par, which indicates that you will not enjoy music genres like RnB or jazz on this video gaming earbud.
You can, however, utilize the equalizer incorporated into the app to fine-tune the mids and treble up until you get the desired effect. Also, the mics built into these earbuds are below average and the 3.7 hours of battery life isn’t the best either. This, however, does not take away the reality that the Razer Hammerhead is one of the very best wireless earbuds for mobile gaming.
2. Bose QuietComfort 20 Noise Cancelling Headphones
Best Noise-Canceling Gaming Earbuds
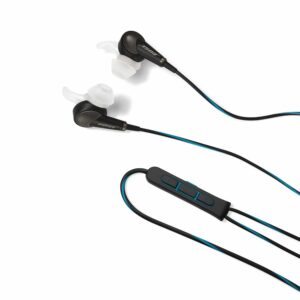
Looking for gaming earphones that can function as an everyday chauffeur? Look no further than the Bose QuietComfort 20 Acoustic Headphones. Bose is a brand that’s well known in the sound engineering industry. The products they provide are first-class and only a few competitors come close to them in ranking. They use a few of the very best noise-canceling earphones and earbuds on the market.
The QuietComfort 20 is the brand’s first in-ear headphones that include noise-cancellation. Designed with an in-line microphone, these gaming headphones supply crystal clear interaction in between you and your teammates. You’ll have the ability to relay information efficiently during game time and likewise make premium calls with these earphones.
Unlike the Razer Hammerhead above, these Bose earbuds come with 16 hours of battery life and sound cancellation functions. While the over $200 price point may be a little high, it’s sure worth everything you’re receiving from these headphones – if your budget is tighter, you might like our sound cancelling headphones under $100 guide. They are extremely comfy thanks to the 3 pairs of StayHear+ ear pointers Bose has consisted of in the bundle. And to make things even better, you get a 3.5 mm cable to make sure that there’s no lag or latency when you’re video gaming.
There are two versions of these earphones and you may get confused while shopping. The Bose QuietComfort 20 or QC 20 is the standard variation and it can be used with any mobile device other than Apple gadgets. Nevertheless, there’s another variant known as the QC20i. This version is for Apple gadgets just. Both variations are sold at the same price.
3. KLIM Fusion Earbuds
Best Budget Earbuds
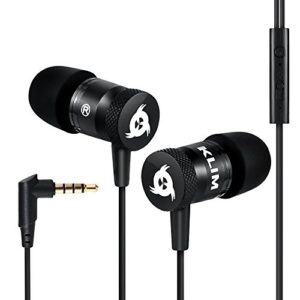
Klim may not be a household name like Bose and Razer, however the brand sure knows how to leave a mark. With the Klim Fusion Earbuds, your mobile gaming experience will not remain the very same. These gaming earbuds feature a terrific develop quality and a balanced sound profile. Fitted with memory foam ear tips, these gaming earbuds can stay in your ears for hours without triggering any pain. Also, thanks to these memory foam ear ideas, you get a level of noise isolation that can not be found in earbuds in the very same price variety.
The ear pointers entirely block outdoors sound, guaranteeing that you get the very best video game and tune audio. The Klim Fusion Earbuds are a few of the very best gaming earbuds for their cost range. For less than $20, you get a set of mobile gaming earbuds that are comfortable, supply exceptional sounds, and constructed to last – see here for more earbuds under $50. The brand is so confident in the quality of its gaming earbuds that it’s offering a 5-year warranty on them.
While the audio quality isn’t as remarkable as what you get on the Bose QuietComfort 20 above, it’s still better than what’s offered by a lot of headphones in the same cost variety. Also, given that it’s a wired earphone, you get the typical 3.5 mm jack. It features an incorporated mic that provides excellent call clarity and you also get 3 pairs of extra ear ideas to guarantee that the earbuds fit completely in your ears.
And to sweeten the deal, Klim decided to offer every client that purchases this product with an ebook on how to optimize the efficiency of your computer while making sure that it lasts long. This really is a brand that cares about its customers.
1MORE Triple Driver in-Ear Earphones.
4. 1MORE Triple Driver in-Ear Earphones
Best Gaming Earbuds with In-Line Mic
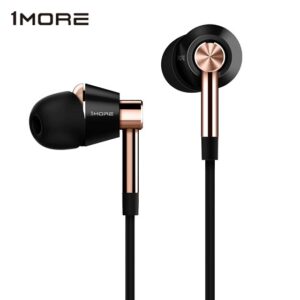
In the world of best gaming earbuds, just a couple of items can match the sound quality provided by the 1More Triple Driver Earphones. These gaming earbuds are designed with 3 different motorists; two armatures and a dynamic driver. With all three chauffeurs working hand-in-hand, users get incredible clearness and bass that are worth more than the less than $80 they are spending for these buds. This does not come as a surprise provided the truth that these gaming earbuds were fine-tuned by a Grammy acclaimed manufacturer, Luca Bignardi.
Unlike the Razer Hammerhead gaming earbuds that are more matched for the EDM and hip-hop genre, the 1More Triple Driver gaming earphones will succeed in most music categories. For more comfortability and long-term use, 1More included 9 sets of ear ideas -6 silicone and 3 memory foam ear tips- in the package. And just like the Bose earphones above, these gaming earbuds likewise include an in-line remote control that enables you to choose calls, play songs, and change volume with ease. A MEMS microphone also beings in the in-line push-button control.
This mic includes some great recording quality, guaranteeing that you’re able to interact effectively when making calls or playing games with your colleagues. Nevertheless, the mic doesn’t succeed in loud environments. If you’re using the earbuds in a crowded area, your voice might not be well transferred to the receiver.
Likewise, the 1More Triple Driver In-Ear Earphones are not the very best when it comes to obstructing outdoors noise. You might want to look somewhere else if this is a big deal for you. Nevertheless, casual players and music listeners are going to love everything about these gaming earbuds. Connected by means of a 3.5 mm jack, these gaming earbuds are offered in only 2 premium finishes-silver and gold.
5. Turtle Beach Battle Buds In-Ear Gaming Headset
Best Buds In-Ear Gaming Headset Devices
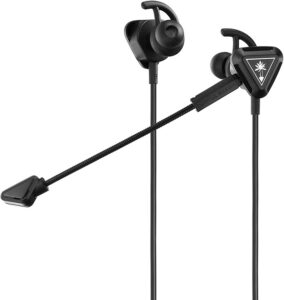
The Turtle Beach Battle Buds In-Ear Gaming Headset is one with an uncommon design. Taking the number five area on our list of best gaming earbuds, this pair of earbuds are particularly customized to satisfy the requirements of players. It is a headset with a boom mic that enables you to quickly communicate with other players. The boom mic can be removed when not in use in order to enhance portability. Thin and quite easy to use, the boom mic sits near your mouth, conveying every spoken word to the other end like it’s absolutely nothing.
Unlike the 1More Triple Driver gaming earbuds, this boom mic will ensure that your voice is heard even if you’re in a loud, congested environment. And considering that they are wired gaming earbuds that work with Xbox One, PS4, PC, and mobile phones, you can quickly switch between gaming devices without any problems.
These Turtle Beach gaming earbuds are bass-heavy and with them sitting easily in your ears, you’ll feel every step, rumble, and surge happening in your action game. The sound profile here is thick and heavy, which implies that you will not be getting the best treble and mids on these gaming earbuds.
These gaming earbuds also include an in-line push-button control that assists manage your music, adjust volume, and receive telephone call. They likewise feature an inexpensive, plastic construct, which may not sit well with some individuals. Additionally, the tips aren’t excellent for long video gaming sessions as they aren’t very comfortable. That, however, doesn’t remove from the truth that these are a few of the best gaming earbuds on the market.
6. HyperX Cloud Earbuds Gaming Headphones
Best Gaming Earbuds For Handheld Devices
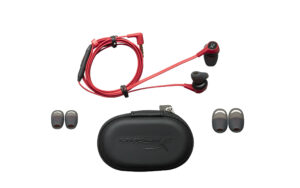
The HyperX Cloud Earbuds are a few of the very best wired gaming earbuds for portable and mobile video gaming devices, specifically gadgets like the Nintendo Switch. They are particularly developed to offer users with an immersive noise experience. The HyperX gaming earbuds are considered to be a few of the best since they tick all of the crucial boxes, including great noise, comfortability, and awesome gaming experience.
They are created with silicone ear ideas that sit over your ear cavity instead of going straight into your ear canal. This guarantees that you remain comfortable while video gaming, especially if you play for extended periods. The fit is tight and you get up to 3 additional pairs of silicone ear ideas to ensure that you get the perfect suitable for your ears. Another reason why the HyperX Cloud Earbuds Gaming Headphones are considered to a few of the best gaming earbuds on the marketplace is because of the immersive noise they use.
Keep in mind that these gaming earbuds are tuned to bring the very best video gaming experience so you might not get the best music listening experience from them. The bass is terrific and the mids and trebles in this design have actually been tuned up. While you’ll absolutely enjoy the noise of surges and shooting in action-packed scenes, you may not enjoy it as a daily driver as it does not provide the best music experience.
The in-line mic is likewise terrific as it provides clear communication on calls and video game chats, including Discord and CoD Mobile chat. Keep in mind that the mic picks up ambient noise too so if you’re in a noisy place, the other party will hear what’s occurring in the background. The construct quality isn’t the very best and it might be a little expensive for a wired gaming earbud. However, it’s still among the best gaming earbuds you can buy.
7. MINDBEAST Super Bass 90% -Noise Isolating Earbuds
Best Noise Isolation Gaming Earbuds
While noise-canceling may be the most preferred function, getting a noise-isolating earbud for less than $20 isn’t a bad deal. This is what makes the Mindbeast Super Bass Noise Isolation Earbuds a few of the best earbuds for gaming. These gaming earbuds use excellent bass and as much as 90% sound isolation. This suggests that your earbuds can help you reduce ambient noises by 90%, ensuring that you get every bit of sound coming from your game.
The stereo result makes everything much better as you’ll have the ability to quickly hear footsteps, surges, and more in your action video game. This pair of earbuds include an ergonomic design that makes them terrific for long-term gaming, exercise, travelling, and running. Compatible with many gadgets with the 3.5 mm earphone port, the Mindbeast Super Bass Gaming Earphones feature an integrated mic and controls that make it simple to interact hands-free and control your volume or music.
You likewise get a waterproof and dirtproof carrying case for this set of earbuds. While you will not get the type of sound quality you ‘d get on the Bose QuietComfort 20, there’s no denying that the bass here is top-notch. These are simply a few of the best sound separating headsets for gaming.
8. Sony MDRXB50AP Extra Bass Earbuds
Best Bass Gaming Earbuds
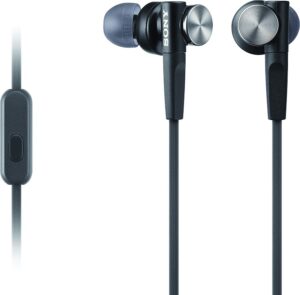
The Sony MDRXB50AP Extra Bass Earbuds are considered to be some of the best gaming earbuds around for those who love bass-heavy earbuds. They give some truly powerful bass sounds out of their speakers. Featuring 12-millimeter dome-type chauffeurs, these gaming earbuds provide a feeling of vibration in your ears. They include hybrid silicone earbuds that sit conveniently in your ears, guaranteeing that you’re able to play your games for a longer duration.
While they do not featured sound cancellation, these gaming earbuds feature a tight acoustic design that permits them to provide users with a high level of passive sound isolation. You’ll have the ability to get more sound from your game and lose some ambient noise thanks to the seal they produce in your ears.
With the Sony MDRXB50AP, you also get an integrated mic in addition to playback controls to help control your music. Lightweight and comfortable, these gaming earbuds are developed with neodymium magnets to make sure that you get top quality noises.
Similar to the Mindbeast above, these gaming earbuds include a carry case and they are designed with a tangle-free cable television so you get to have better video gaming experience. If you’re aiming to get the very best gaming earbuds with really heavy bass, these are some of the leading alternatives you can choose.
9. Beats Urbeats3 Magnetic Earbuds
Best Neutral Sounding Gaming Earbuds
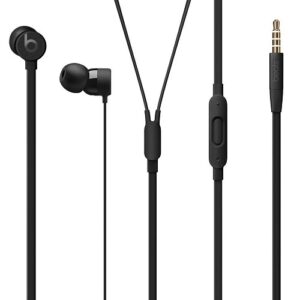
The Beats Urbeats 3 Magnetic earbuds are some of the best gaming earbuds you can pick if you’re trying to find wired earphones with excellent sound reproduction. With a price less than $60, you get a set of comfy gaming earbuds that use a well balanced noise profile. While they aren’t as comfy as the 1More Gaming Earbuds in our evaluation, they will not cause discomfort to your ear canal. These gaming earbuds are breathable and stable for daily travelling and sports.
They provide a great level of passive sound seclusion like the 1More gaming earbuds, and they include fins that assist supply them with more stability. Thanks to their magnetic buds, you can easily use them around your neck without tangling the cable. Also, these Beats headset for gaming provides terrific bass that is obvious in action-packed scenes.
They do have actually limited compatibility with Android gadgets as they were made to work perfectly with iOS devices. You won’t have the ability to use the in-line remote volume controls if you’re using these gaming earbuds with an Android gadget. Also, their cable is short, which implies that you can’t view TV with them, and their microphone doesn’t succeed with console gaming.
On the advantage though, they are simple to bring around and their wired connection helps in reducing latency. So basically, while the 1More video gaming earbud is ideal for those looking for convenience, the Beats Urbeats Magnetic Earbuds are best for those who want a neutral sounding video gaming earbud.
10. HP Gaming Earbuds with mic Deep Bass
Best HP Gaming Earbuds with mic
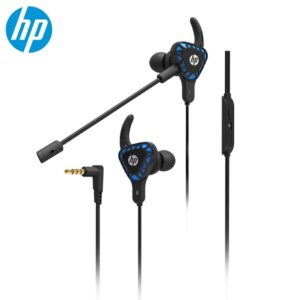
Featuring a style that’s comparable to the Turtle Beach Battle gaming earbuds, the HP Gaming Earbuds are awesome options for those looking to buy the best gaming earbuds for their phones, PC, and consoles without spending much. With a price tag less than $25, these gaming earbuds share many similarities with the Turtle Beach earbuds, consisting of a boom mic, an in-line mic, along with the ability to work with consoles, PC, handheld, and mobile phones.
They offer terrific audio quality and both microphones work effectively. The only con here is that they aren’t the very best for listening to music with a great deal of treble and mids.