

Have you ever experienced a situation anywhere you successfully connected to a WiFi network but still had no access to the internet? It is a common issue on the web that happens to users all around the world. And while there is no original solution to this problem, several fixes are proven to resolve the WiFi Connected but no internet issue.
How to Solve “Wifi Connected but no Internet”
Automatically Repair Windows Errors
System Information
- Your machine is currently running Windows 10
- This Repair Utility is compatible by your operating system.
Recommended: To repair Windows Errors, use this software package; Restoro System Repair. This repair device has been proven to identify and fix these errors and other Windows problems with very high efficiency.
- 100% safe, as confirmed by Norton.
- Only your system and hardware are evaluated.
It’s worth noting that the issue can be caused by both your hardware/router and your software/device, so it’s best to implement solutions on both ends.
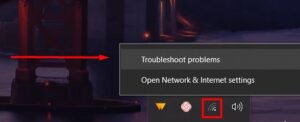
Fix 1: Run the Windows Troubleshooter
When it comes to fixing common problems on your computer, it’s always a good idea to use the built-in Windows Troubleshooter program. The troubleshooter also works for the WiFi connected but no internet access issue. You can enter it by right-clicking on the WiFi icon found in the taskbar and selecting the ‘Troubleshoot problems‘ option.
Although it usually does not fix the problem independently, it can still help us identify the actual problem.
If the problem persists, you can try implementing some of the fixes below. These methods are proven to work time and time again for users all around the world.
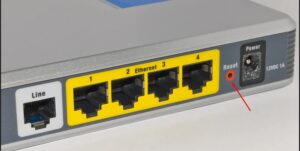
Fix 2: Restart Your Devices
If the problem is still there, it may be caused by your router or modem rather than your computer. The router configuration will sometimes get messed up, causing the WiFi connected but no internet issue. This can be quickly resolved by restarting your router or modem if you’re using both. To restart your router, press the restart button found on the hardware, then wait for 60 seconds before turning it back on.
Once done, restart your pc and try to connect to the internet again. If the router caused the problem, it should be fixed with this simple method.
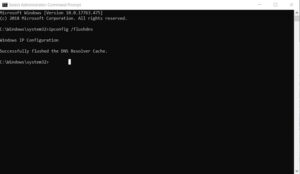
Fix 3: Flush DNS
DNS cache conflict is other common problem known to cause issues with access to the internet. This happens from time-to-time, and it can be fixed by simply flushing the DNS cache. Follow those steps to flush your DNS cache:
Step 1:
In the Windows start menu, type ‘cmd‘ and run it as administrator. This will start up the command prompt window with admin privileges.
In the command prompt, type ‘ipconfig /flushdns‘ to flush the DNS cache.
If you’re still connected to WiFi with no internet, go ahead and try the methods below.
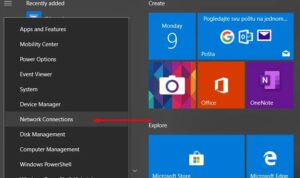
Fix 4: Change Your DNS Server Address
If you’re having issues with your WiFi network, chances are it might be due to a DNS or IP address conflict. Your pc is usually assigned to automatically get the IP settings or a static IP address setting. Either method, changing up the IP address settings is a known solution to many problems with a faulty internet connection.
Step 1:
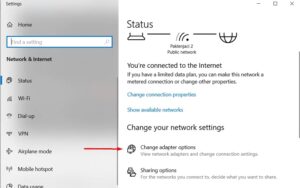
From the start menu, right-click on the windows button and select ‘Network Connections‘.
Step 2:
When the network window pops up, select ‘Change Adapter Options‘
Step 3:
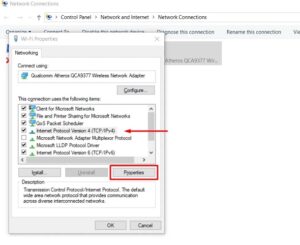
Find the WiFi network you’re trying to connect to, then right-click and select ‘Properties. ‘

Step 4:
On the pop-up window, select ‘Internet Protocol Version 4 (TCP/IPv4)‘ and click ‘Properties‘.
Step 5:
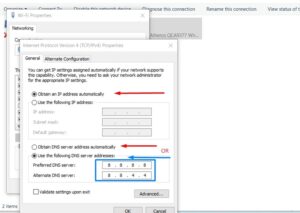
Next up, you will have two options depending on whether you’re using your IP address automatically or statically. If you’re using static settings, select both options to ‘Obtain an IP/DNS address automatically‘.
Otherwise, we suggest you select the second option and type in Google’s Public DNS IP addresses. Google’s Public IPv4 addresses are:
- 8.8.8
- 8.4.4
This will change your DNS operator from your ISP to Google, which may fix the issues with your WiFi Connected.
In short, there are two options:
- If you’re using a static address, then select ‘Obtain an IP/DNS address automatically. ‘
- If you’re already automatically obtaining the DNS address, switch to Google’s servers.
Step 6:
Restart your computer, and the changes should be applied automatically.
Fix 5: Update Network Drivers
Outdated or corrupted network drivers are also known to cause the WiFi Connected but no internet problem. Luckily, there’s an easy way to fix up your drivers, and all it takes is a quick update with the latest drivers. If you can’t connect to the internet to do this, you will have to download the drivers manually.
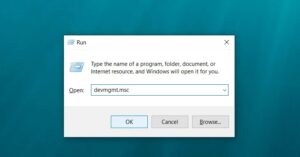
Step 1:
To start the device manager, press Windows+R keys and type in ‘devmgmt.msc‘
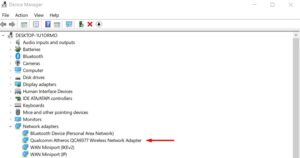
Step 2:
This will open up a new device manager window, where you can find a list of devices and drivers. For network drivers, expand the ‘Network adapters‘ section and find your Wireless adapter, in this case, it’s Qualcomm Atheros QCA9377 Wireless Network Adapter. Right-click on the adapter to select the ‘Update driver option.
Step 3:
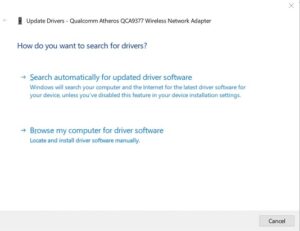
You will get a pop-up window asking you to choose whether you want to update your drivers automatically or manually. Your PC needs an internet connection to update automatically, so we suggest you plug in an Ethernet cable or connect to another WiFi. Select the ‘Search automatically for updated driver software option and install the right driver.
Step 4:
If you can’t connect to the internet, you will have to manually download the driver and copy it over to your PC. After that, select the second option to install the latest network drivers manually. Once you have the latest drivers for your network adapters, reset your computer and connect to the internet.
Fix 6: Network Reset
If all else fails, you can always choose to completely reset your network settings, automatically reset all network settings and fixing any errors. This will revert everything to original settings, and you will lose your WiFi passwords, VPN connections and so on.
Step 1:
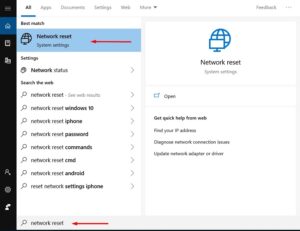
If you’re using Windows 10, click on the windows button and type in ‘Network Reset‘.
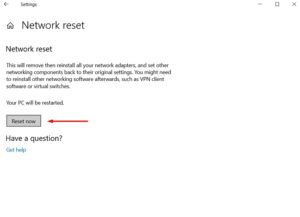
Step 2:
A new window will pop up. Select ‘Reset now‘ to revert your network settings to the original.
This is the last step you can take to fix your WiFi connected manually but with no internet issue. In most cases, these methods will work, and your WiFi Connected will be in full power. If you’re still having problems with your internet connection, contact your ISP.
Fix 7: Contact Your Internet Provider
Ultimately, the WiFi connected, but your internet provider could cause no internet problem, and if everything else fails, contact the ISP and ask for assistance. They will be able to assist you and resolve any issues on their end quickly. Still, it’s best to try some of the methods above as the provider rarely causes these issues.