
Many users face the problem of no audio and sound on their Windows 10 system. This issue often occurs after you have upgraded from a previous version of Windows to Windows 10.
If you are facing Windows 10 No Sound audio problems, you need not panic. These issues are easy to solve with our example. We have given seven easy fixes from which you can use anyone that works for your system.
Windows 10 No Sound: How to Fix Audio Problems
Automatically Repair Windows Errors
System Information
- Your machine is currently running Windows 10
- This Restoration Utility is compatible with your operating system.
Recommended: To repair Windows Errors, use this software package; Restoro System Repair. This repair tool has been proven to identify and fix these errors and different Windows problems with very high efficiency.
- 100% safe, as confirmed by Norton.
- Only your system and hardware are evaluated.
Note: we have a detailed example that deals with more specific HDMI audio problems.
Check Your Speaker Settings
Here are the steps to check the speaker settings:
Step 1
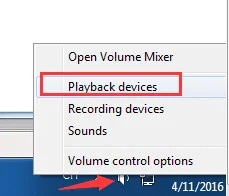
In the right bottom corner of the desktop, you can find the speaker icon. Right-press on it and choose Playback devices in the window that opens.
Step 2
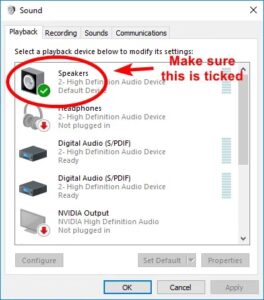
Check whether there is a tick in green colour against the speakers under the Playback tab. This green colored tick denotes the speakers remain as the primary default device for audio playback.
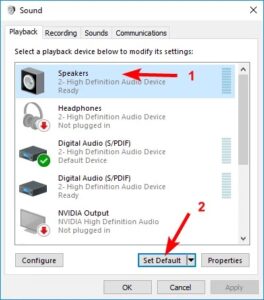
If the speakers are not set as default, you have to press the speakers, choose the Set Default option, and press the OK option. Test whether the sound problem has resolved.
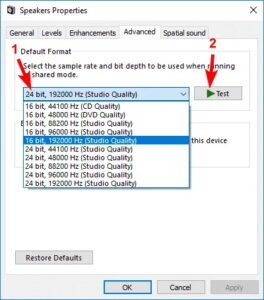
If the sound problem persists even after setting speakers as the default device for playback, you need to test with other audio formats. Press on ‘Speakers,’ and then on ‘Properties‘ option.
Step 3
Select ‘Advanced tab‘, select another bit depth and sample rate in the Default Format section, and press on Test.
Keep repeating this method until you get a format that solves the problem. Press on the OK option. If not, move on to our next solution.
Uninstall and Re-install Audio Drivers
No sound problems can occur if the sound driver is corrupted, removed, or incompatible with your Windows 10 system. You have to uninstall the audio driver using the following steps:
Step 1
Press the Windows key and the X key simultaneously. This will open the menu for fast access.
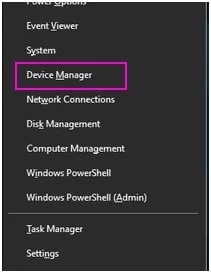
Step 2
Click on ‘Device Manager
Step 3
Expand the Sound, video and game controllers now under Device Manager. Use right-Press on the sound card. Select the Uninstall option.
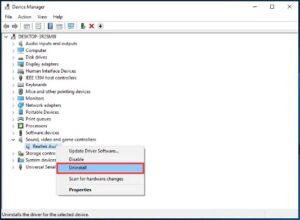
Step 4
If you are prompted to verify the uninstall command, check the box with ‘Delete the driver software for this device‘ and select OK.

Step 5
Now restart the computer to find out whether the sound problem is resolved. If this does not rectify the issue, move on to our next step.
Update Audio Driver
If experimenting with other audio enhancements and uninstalling your audio driver didn’t bring back your sound in Windows 10, you’re likely using the wrong audio driver.
Using an incompatible audio driver may also cause the issue. You can update the driver manually or by the automatic method.
Manually Update Drivers
Visit the manufacturer’s website and find the most recent device driver for the sound card in your system and the version of Windows 10 you have.
Automatic Driver Updates
You can also use software like ‘Driver Easy’ to update the driver. This tool will identify your system, select the right driver for the Windows 10 variant and sound card you possess, and install the driver on your system correctly.
Turn Off Audio Enhancements
For the sound card to work correctly, the audio enhancements feature is necessary. But this can obstruct the performance of the driver. So you have to turn off the upgrades by following the steps below:
Step 1
Press both R and Windows key simultaneously and type Control in the search box. Now press the Enter key.
Step 2
Under the Large Icons, select the Sound option.
Step 3
Under the playback tab in the sound option, select the default device and right-press on it. Select Properties in the drop-down menu that appears.

Step 4
Select the Enhancement tab and tick the ‘Disable all sound effects‘ tab now.
Step 5
Check whether the sound has returned. If the sound problem persists, revert his option, repeat steps 2 and 3 with the different default devices, and try again.
Fix Realtek Audio
Changing the Realtek high definition audio driver can also solve the sound problem. Here are the steps for this solution:
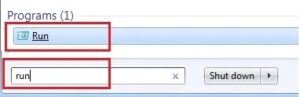
Step 1
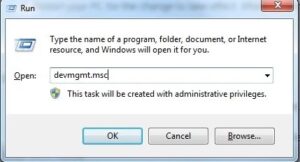
Press on the ‘Start menu and type ‘Run‘ in the search box. You will find the ‘Run‘ dialog box displayed on the desktop.
Step 2
In the Run box, type devmgmt.msc and press OK to open the Device Manager.
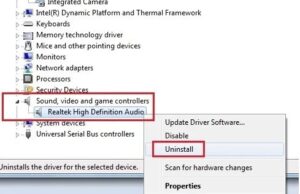
Step 3
Expand the ‘sound, video and game controllers‘ under device manager. Use the right-press option on ‘Realtek high definition audio. You will notice a pop window with a context menu. Select the Uninstall option.
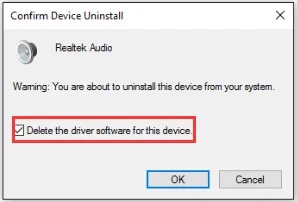
Step 4
Check the box beside, ‘Delete the driver software for this device‘ and select OK.
Step 5
To make the changes effective, you have to reboot the system. Once the system restarts, it will reinstall the Realtek driver.
Check the Audio Troubleshooter
You can also resolve the issues in the Windows 10 operating system itself. The inbuilt troubleshooter feature in Windows 10 can help identify the audio or network problems you face with the upgraded operating system version.
Here are the steps for this solution:
Step 1
In the sound icon now in the taskbar, use the right-press and select the ‘Troubleshoot sound problems‘ option from the sound icon menu. The troubleshooter feature will be activated. It will automatically scan and identify any errors present.

Step 2
If the troubleshooter identifies an issue, it will send you a notification or try resolving it automatically if possible.
If it does not automatically fix the problem, it will inform you about the issues found in detail and provide you with steps to follow to resolve them on your own.
If it does not find any visible fault, it will just say that the device did not identify any problems and provide you with other options.
Step 3
If the troubleshooter indicated an unplugged audio device, you have to check the connection between speakers and the physical link. You need to verify the link for proper connection.
Restart the Windows 10 Audio Services
In some cases, a disabled audio device may cause sound and audio problems. In such a situation, you have to disable the audio services and re-enable them.
Here are the steps involved:
Step 1
Press Windows key and R key to start the Run feature.
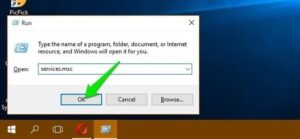
Step 2
Type the letters “service.msc” to support the launch of the ‘Services‘ option.
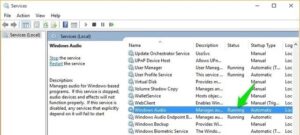
Step 3
Choose Windows Audio service and ensure the status of the service as ‘Running.’ You can also right-press on the ‘service‘ option and use the ‘Start‘ feature from the menu for initiating the service.
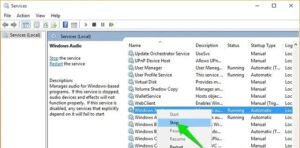
Step 4
You have to restart the system to fix any problems. You need to use the right-click of the mouse on the service and select ‘Stop‘ for disabling the service.
Now right-click again and select the ‘Start‘ option to make the service function.
Frequently Asked Questions
How do I get my Sound Back on Windows 10?
No sound problems can occur if the sound driver is corrupted, removed, or incompatible with your Windows 10 system. You have to uninstall the audio drivers.
Why does my Computer have no sound?
You usually have to fix sound problems after upgrading your PC to the latest operating system. The majority of the time, it arrives with new Windows 10 installations.